Saturday 25 February 2017

Diploma Module 1 Chapter 7 - Colour and Texture in Stitch...continued

Sample 5 (Image 236: max dimensions 9cmWx10.5cmH)


Aim - to make a bird brooch (for our branch of the Embroiderers' Guild).  It takes inspiration from Seasalt.
Background - two small pieces of white cotton.  Inktense pencils after stitching to give the grey on the tail and the yellow beak.  Stitched piece bonded onto pelmet vilene with PVA. Trimmed. Coated back and front with acrylic wax.
Stitching - double running stitch, kantha overstitched with fly stitch in places.
Observations

  • a splash of yellow is all this design needs to lift it 
  • acrylic wax and pelmet vilene make a surprising resilient structure.

Sample 6 (Image 237)


Aim - to make a distressed gull string
Background - image pencilled onto Regular 70g Lutradur and coloured with Inktense pencils (Image 238)


Image 239 - Inktense pencils given a wash with water to make them permanent.  Note how beautifully the colour flows on the Lutradur.


Image 249 - free machine stitched (no hoop required as Lutradur stable to stitch).


Image 241 - cut out - used scissors but in hindsight soldering iron would have given better edges.


Image 242 - distressed with heat gun.  When lit gives wonderful shadows.


Stitching - free machine embroidery using variegated grey Gutermann Sulky
Observations - this has definite possibilities though it is a bit too gully...needs abstraction! (or maybe just more heat!!!! i.e extreme distressing...a little like the extreme metallic rub-ons and extreme hand washing prior to dyeing!)
 
Sample 7 (Image 243: 26cmWx20cmH)


Aim - to use the monoprint drawing Image 141 (which has proved the most popular to date on Instagram) for extended stitch samples.
Background - using the original image (A5 size) I took one corner which had particularly pleasing brayer marks and enlarged some sections to produce a background and two smaller sections on copier paper.  These were all stabilized on light weight iron-on vilene.   Once stitched the two smaller pieces were mounted on 3mm foamboard and the larger piece on cardboard.
Stitching
Image 244 - background - blanket stitch in black flower thread. 


Image 245 - bottom right panel - applied acrylic painted scrim using free machine embroidery...spool thread visible... and then free-machined sympathetically to print marks using grey mercerised cotton.


Image 246 - top left panel - needle weaving over gull shapes using white DMC Cebelia; fly stitch over heavier brayer marks using black flower thread; free-machine embroidery using grey mercerised cotton.


Observations - as I sat looking at this piece over breakfast, the placement of the smaller panels brought to mind a mobius strip, the eye being constantly taken back into the panel and giving it a sense of movement.  Another happy accident that has definite future possibilities.  The placement of the smaller panel also isn't the norm, the smaller images being in the forefront.  However, it works for me and heightens the movement within the piece.

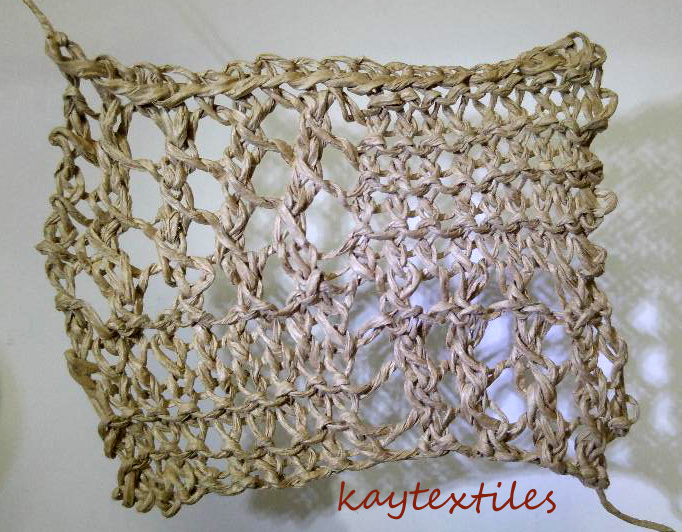
Sample 8 (Image 247-249)
Aim - to use the monoprint drawing Image 141 (which has proved the most popular to date on Instagram) to incorporate twining.


Background - A5 copy of original image bonded onto 3mm foamboard.
'Stitching' - structure twined to twist sympathetically from print to give impression of movement. Black paper yarn warp and white folded paper yarn weft. Added white paper yarn to give impression of birds in flight. Warp, split, couched through foamboard and then knotted. Additional warp also split and knotted.


Observations - this was my first attempt to incorporate twining into my work, and,
  • it would have integrated more sympathetically if there had been some texture in the panel to which it was attached
  • the panel to which is was attached should have been smaller (Image 247 showing less panel works better for me)
  • the additions to the twining would have been more striking in black (originally these had been in white raffia with some grey markings and more pronounced, but they looked out of place - sorry I didn't take a photo)
  • something to think about as I love the texture...and the black and white.
Other stitch samples already on blog: work from summer school with Jan Beaney and Jean Littlejohn, Debbie Lyddon workshop, Lynda Monk workshop, boro-related samples and header image.

Tuesday 21 February 2017

Diploma Module 1 Chapter 7 - Colour and Texture in Stitch

Sample 1
Aim - to produce a feeling of a gull against the sky using stitching that replicates the woven texture of feathers
Background - 140gsm extra wet strength paper heavily coated with Seawhite acrylic, mixed to give a dark indigo/black and surface texture
Stitching - free machine-stitched photocopy paper soaked in water and distressed then laminated to acrylic paper with Golden Matt Medium. The remaining background also coated with Matt Medium (Image 226).


Hand stitched in detached chain stitch with variable length tails using grey variegated katia Jaipur mercerized cotton, DMC Cebelia and Finca Perle Egyptian Cotton (Image 227).


Finally the sample was given a coating back and front with paraffin wax.

Sample 2
Aim - as in Sample 1 but using the open structure of the machined paper to produce shadows on a background of sea.
Background - calico coated with white emulsion and then gelli printed with acrylic paint.  Gull shapes were cut from the background.
Stitching - Two of the gulls were created using the same technique as in Sample 1 but rather than a regular grid, more directional stitching was used (Image 228).


These were soaked and distressed as before and attached to the back of the sample with Golden Matt Medium.  The third cut out was filled with dish cloth cotton.  The sample was then waxed with paraffin wax (Image 229).


This sample could have been left as it was to produce shadows from the open grids.  However, I continued to experiment with the open structures created to produce composite stitches (Image 230).


  • dishcloth gull - from left - tent stitch, Swiss darning, chain stitch, stem stitch using split cream sari silk yarn; Swiss darning, chain stitch and needleweaving using grey DMC Cebelia; random cross stitch using grey variegated flower thread and grey variegated katia Jaipur cotton; needleweaving using various colours split sari silk and silk crepe yarn,
  • small machine structure gull - tent stitch in split cream sari silk yarn,
  • large machine structure gull - needleweaving using split cream sari silk yarn.
Sample 3 (Image 231)


Aim - to produce sampler of relevant stitches/structures
Background - calico coated with white emulsion and then gelli printed with acrylic paint.  Rust, tea and turmeric cottons, machine appliqued and then coated back and front with paraffin wax (unless specified).
Stitching

  • top left - Fly Stitch using crochet cotton, paper covered wire and flower thread on tea-rusted cotton (Image 232)


  • middle left - Wave Stitch using crochet cotton, stranded cotton, variegated cotton on tea-rusted cotton
  • bottom left - Buttonhole Rings using florist wire (Image 233) and George Weil paper yarn on tea-dyed cotton


  • centre - free machine embroidery on turmeric-dyed cotton (before waxing)
  • top right - French Knots using grey variegated flower thread on tea-rusted cotton
  • bottom right - kantha using variegated mercerised cotton on tea-rusted cotton (not waxed).

Observations
I have used acrylic wax in previous samples and found it to enhance the colour, e.g. Images 165 and 167. It was, therefore, a surprise to find that surface treatment with paraffin wax deadened the colour of the turmeric-dyed cotton, merging the top colour with that underneath.  It gave the sample a more muted look. Sadly, I didn't take a 'before waxing' picture but the turmeric was as bright as the dyed cotton in Image 221.
It was hard to control the thickness of the application of wax.  On initial application with a thick brush it was too heavy and had to be ironed off between newspaper taking care not to get the wax on the iron by using baking parchment.  Ironing flattened the distressed paper grid, perhaps to its detriment.
Health and Safety - try not to get dry wax on the floor as it makes it very slippery.
Buttonhole Rings - depending on how many times you wrap the mould before starting the buttonhole covering, you can change the height of the rings. The interlocking florist wire rings worked particularly well.

Sample 4 (Image 234)


Aim - to produce sampler of relevant stitches/structures
Background - paraffin waxed calico, heavily waxed
Stitching - from left to right

  • grey raffia couched with feather stitch using DMC Cebelia and overstitched in feather stitch using variegated flower thread
  • distressed crepe sari silk feather stitched using grey variegated flower thread - note on the right how you can pull the silk along the stitch until you get the desired effect (Image 235)
  • cream distressed sari silk feather stitched using thin grey cotton covered wire
  • feather stitch using grey DMC Cebelia.  Note how the needle mark leaves a cloudy ring in the paraffin wax.  This can be removed (if you want to) by gently heating the wax with a hair drier.

Thursday 9 February 2017

Diploma Module 1 Chapter 6 - Colouring of Materials - Option 1

I was reluctant to start this chapter: in fact I have started looking at subsequent chapters. This was probably for two reasons. First, I had not used procion dyes (one of the reasons I chose this option - this will be overcome by just doing it, obviously) and second, and more importantly, I was not quite happy with my colour scheme. Image 181 gave me the indigo tweak and now I'm going for a second adjustment. So, I'll use my indigo colour study but slightly tweaked so that it resembles the colours in my Boro influenced work (Images 156-167).  The palette I will be working with is shown numbered 1-7 in Image 208. The only real changes are the red and yellow which I felt were too dominant. And yes, I found I couldn't be without that dusky pink after all.


Observations from this colour mixing:
  • the Golden Fluid Acrylic Payne's Grey is very blue/black, predominantly blue.  Since being introduced to Payne's Grey by Alison King at the Summer School 2014 I have used it a lot and this is the first time I've found it so... blue.  I therefore reverted to the Amsterdam Expert Series.
  • there are two sets of 2/3, one using a base black and the other Payne's Grey.  Either will work for me.
  • there is a choice from the three shades of yellow ochre, depending on the mixing.
I have chosen to use cold water 'fibre reactive' dyes, procion MX dyes, as I intend to dye natural fibres. I have followed Helen Deighan's methods given in Magic Dyeing Made Easy.

Prior to dyeing the fabrics they were PFD'd - Prepared For Dyeing, by washing them.  While doing this I noticed that small quantities of open woven fabrics, e.g. scrim and some linens, are very delicate and become misshapen or even disintegrate no matter how carefully you wash them. This worsened on handling in the dyeing and rinsing process.

The dyes were made up using 1 level tsp dye to 100ml water. I mixed them in small, lidded jars. I also added a drop of washing up liquid as I read this helped to mix the dye powder.  After the dye was mixed I dipped a piece of kitchen roll in the dye as it was not obvious what colour you have in the jar (Image 209). These were included on each colouring page to remind me where the colours had come from.


The washing soda solution was made up from 400g soda to 2 litres water.
The salt solution was made up from 500g salt to 2 litres water.

The fabrics used, the colour samples obtained and the technical notes on how the dye colours were obtained are all in a new A4 sketchbook - Images 210 - 219. Idea 1 was used to organise the production of these samples but rather than stitching them together after dyeing I mounted them on separate pages as some of the fabrics had become so 'worn', particularly the plasterers' scrim and the dish cloth cotton.  This meant the strip of fabrics had to be cut to mount them but it does have the advantage that the wonderful edges can be more easily appreciated.


Health and Safety
I was particularly careful when mixing the procion MX powders and wore a face mask to prevent inhalation of the powder.  All my ingredients were carefully labelled and will be stored away from the kitchen, where I did my dyeing.

Other dyeing agents were also sampled. Turmeric powder was used following the recipe given on timberpress.com.  The material was left simmering for 23 minutes (the cooking smell was very pungent).  The colour obtained is shown in Image 221. The wooden barbecue skewer used for stirring the mixture is also attached as it coloured well.


Tea was used and a sheet of 'fabric' made from tea bags was also produced by ironing them on to vilene, part of which was waxed with acrylic wax.  The texture of the iron-on vilene used can be seen through the tea bags.  If this was not wanted a different make of vilene could be used (Image 222).


While collecting research material for my sketchbook I have taken many photos of lobster pots and so have included some rust dyeing here as it is in keeping with my research subject and I was hopeful it would produce not only the yellow ochre colouring #6 but also, given the appropriate wetting agent, variations on the blue #4.  During the Surrey Open Studios 2016 I attended a workshop with Jule Mallett which gave me lots of rust related inspiration and samples of unwrapping.  Two tins were used that I had left outside to rust.  These I wrapped in loosely woven cotton that had been soaked in tea made from 2 teabags to a pint of liquid.  I left these in a heated kitchen for 24 hours and then unwrapped them,  rinsed well and washed (Image 223).


This was developed with gulls in mind, using tea made from two tea bags as the wetting agent (Image 224 and 225).  These photos show the front and back after 2 days.  After one day I sprinkled the couched metal gulls with salt to speed up the process.