Thursday 21 January 2016

Diploma Module 1 Chapter 3 - Texture and Surface Relief Study...continued

Extending the idea in Image 58, I made ridges in a sheet of white paper using a crimping machine. As the paper passed through the machine I also made some folds in it.  Using tracing paper I cut out gulls from the crimped paper using the design in Image 54, ensuring the crimp lines were always aligned with a line through the head and tail. These gulls were stuck onto black card.  As I manipulated the paper, because it was crimped, it stretched and so didn't fit as snuggly as before.  This meant some parts of the gulls were raised from the paper - to good effect, as it gave the design a feeling of movement (Image 65). Note the image was lit from the side to highlight the contours.


Now meet Godfrey-Long-Legs (for obvious reasons), my gull made at a paverpol sculpture workshop http://www.paverpol-uk.co.uk/ (Image 66).


When the body of the gull was completed, I coated distressed strips of scrim with paverpol and laid these on the body to give the texture of feathers (Image 66A).


Hoping to replicate this idea, and also the folds produced by crimping, using Mod Roc (from Seawhites) I sewed four rows of running stitch and pulled these up to gather the material.  This was gently soaked in water and left to dry.  (Note: When you stitch, loose Plaster of Paris drops from the Mod Roc.  Cover your surface as it is very messy.  You might also want to wear rubber gloves.   Also try to avoid inhaling the powder.)  Image 67 shows the result...not very promising.


Image 68 - gull cut from corrugated paper covered with gesso.  The crimps are more pronounced than those produced by the paper crimped using the machine.


Image 69 - gull silhouette made from climbing plant wire.  Good shadows!


Image 70 - gull in the style of a Day 3 contour sketch (Image 71) from a Ten Day Drawing Course (I'm not sure if I interpreted the instructions correctly but I liked the result I obtained.)  After bending the climbing plant wire in this continuous design I wove more wire through it.  I liked the result and felt it was on route to abstraction.  Also good shadows.


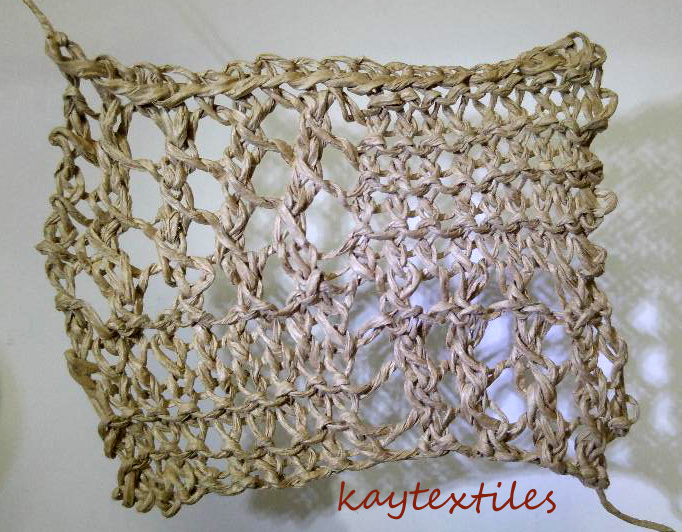
Image 72 - plaited climbing plant wire to represent feathers.  More good shadows!


Thursday 14 January 2016

Diploma Module 1 Chapter 3 - Texture and Surface Relief Study...continued

I scanned a Day Three drawing from a Ten Day Drawing Course (Image 52);


simplified it in Photoshop Elements (Image 53);


and then recomposed and scanned it (Image 54).


This image was printed on card, cut out and photographs taken of the shadows produced (Image 55). 


Using the same image, different materials were added to produce textural effects (Image 56).  These are detailed below.


Image 57 - Tissue Shred, cut, folded and attached using dilute 50/50 PVA to give suggestion of feathers.


Image 58 - Tissue used to fill shoes - layered with dilute 50/50 PVA then pummeled with the end of the paintbrush until it formed paper pulp.  Once in place, fine lines were added with scalpel to again suggest of feathers.  The ridges produced resembled smocking - which might prove useful if this design was taken into stitch.  I liked this one!


Image 59 - Dishcloth cotton - attached with PVA.


Image 60 - White tissue - layered, folded and attached with dilute 50/50 PVA.


Image 61 - Kozo paper - soaked in water, distorted and layered using PVA.


Image 62 - Kozo paper - soaked in water, pulled and separated until very thin.  Soaked in PVA and marks added with scalpel.


Image 63 - White raffia - ripped into strips and attached with dilute 50/50 PVA.  Some markings added with scalpel.


Image 64 - Scrim - distressed and layered with dilute 50/50 PVA.


Friday 8 January 2016

Diploma Module 1 Chapter 3 - Texture and Surface Relief Study

Happy 2016!

Alongside creating A5 Sketchbook pages, I have also been using a 14cm square sketchbook for the 10 Day Drawing Course exercises.  I started using a  Schleich seagull http://www.amazon.co.uk/Schleich-14720-Seagull/dp/B00GVT5OI2/ref=sr_1_1?ie=UTF8&qid=1452252972&sr=8-1&keywords=toy+gull+plastic  which had the added advantage that it was textured so I was able to take rubbings (Image 28), though due to its size this was quite a challenge. Three-year olds obviously have smaller fingers!


For the texture and surface relief study I’ll include pages from both sketchbooks. As the content of some of the pages I was creating for Chapter 2 seemed to be overlapping with work on this chapter I’ve included them here.

I started to pursue methods of obtaining a feathered effect and returned to Images 22 and 23 where I had done some sample stitching on a cardboard cutout monoprint.  I made three stitch print ‘blocks’ – raised chain band, raised stem stitch and feather stitch – from which I made prints on different surfaces, overprinting to try to obtain a usable effect (please excuse the ones that aren’t on black and white paper as they were made before I read the instructions for chapter three).

Raised Chain Band (Images 29 - 36)


Raised Stem Stitch (Images 37 – 41)


Feather Stitch (Images 42 – 47)


Not surprisingly I felt the feather stitch prints were the most successful!

I took rubbings from the Schleich seagull, either on tissue or layout paper, to pick up the fine textural markings.  After taking the rubbings I laminated them on to sketchbook pages with dilute PVA.  Some of the results were very promising.


Image 48 - 2B rubbing on tissue paper.


Image 49 -  wax rubbing on layout paper.


Image 50 shows Image 49 after it has been washed with dilute Quink ink and then discharged with dilute bleach.

From the above three images I went on to produce Image 51 which is a distressed muslin highlighted with Inktense pencils.