
Friday 28 February 2014
Taster Module 4 – Shape Observations
All these shape observations are based on Image 4.
Image 16 is a shape observation in torn black tissue paper on drawing paper.

The paint covered mask in Image 17 was produced while producing a monoprint using a silicon sponge ‘plate’. It shows the transparent mask made from a thin punched pocket after it had been used on the silicon sponge plate brayered with black acrylic paint (it has a piece of white paper behind so that it could be scanned). The two resulting monoprints are shown in Images 18 and 19.

Ghost monoprint on thick tissue using the silicon plate after image 19 had been taken and the mask removed.

Monoprint on photocopy paper made using the mask in Image 17 with second colour added.

The third study used a printing block made from an Amazon box.
The relief on the block was made from strips cut from the corrugated card of the box which were manipulated into place, cutting the box to both to retain and lose the detail of the corrugation.

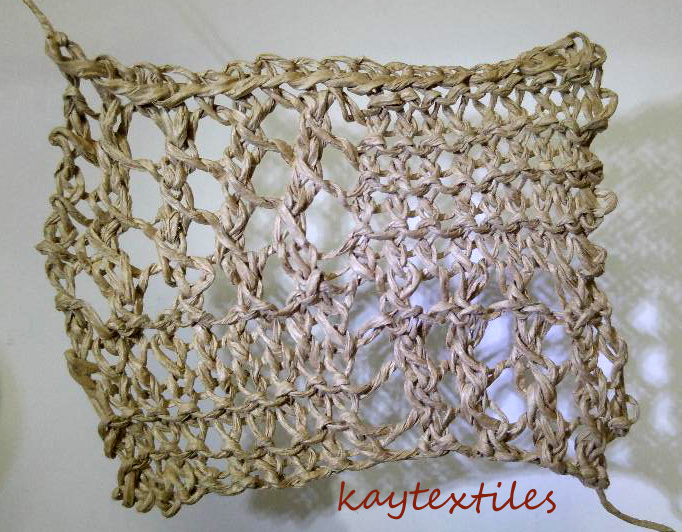
Print taken from the block on thin tissue paper. The detail on this print was finer than I had anticipated but I was able to take rubbings from it to make coloured papers later.

Image 16 is a shape observation in torn black tissue paper on drawing paper.

The paint covered mask in Image 17 was produced while producing a monoprint using a silicon sponge ‘plate’. It shows the transparent mask made from a thin punched pocket after it had been used on the silicon sponge plate brayered with black acrylic paint (it has a piece of white paper behind so that it could be scanned). The two resulting monoprints are shown in Images 18 and 19.

Ghost monoprint on thick tissue using the silicon plate after image 19 had been taken and the mask removed.

Monoprint on photocopy paper made using the mask in Image 17 with second colour added.

The third study used a printing block made from an Amazon box.
The relief on the block was made from strips cut from the corrugated card of the box which were manipulated into place, cutting the box to both to retain and lose the detail of the corrugation.

Print taken from the block on thin tissue paper. The detail on this print was finer than I had anticipated but I was able to take rubbings from it to make coloured papers later.

Taster Module 3 - Make a Colour Study


Image 15 was made using a roller (into which channels had been carved) and a stencil brush.
It is included in this section as it gives a feeling of the colour distribution and how it forms layers, as indeed the bark does.

Taster Module 2 – Record Your Observations
These rubbings were taken from the tree.


Image 7 was enlarged to be used for stitchery.


Image 7 was enlarged to be used for stitchery.

Sketchbook Covers
I’m putting together an A5 sketchbook as I work through the tasks.
These are the covers prepared from a Photoshopped photograph of the tree and a sheet of Manchurian Cherry text.
Front Cover

Pastedown Endpaper Front

Pastedown Endpaper Back

Back Cover

(The trunk on the front endpaper moved a little as it was glued in place, something to watch out for next time.)
Monday 17 February 2014
Taster Module 1 - Choose a Wall to Study
As walls in our part of the world aren’t particularly memorable, I donned wellies to venture out between downpours and head for one of Croydon’s best kept secrets, The Wettern Tree Garden.
I had originally thought of using the trunk of the Osage Orange Tree (Image1) but decided it was too highly textured and the rubbings would be unsuccessful.

I decided instead to use the Manchurian Cherry Tree (Images 2 – 6).


Notes on the above:
I had originally thought of using the trunk of the Osage Orange Tree (Image1) but decided it was too highly textured and the rubbings would be unsuccessful.

I decided instead to use the Manchurian Cherry Tree (Images 2 – 6).


Notes on the above:
- the splash of orange in Image 2 - plastic orange barrier fencing - a reminder for later when making papers
- the little touch of green in Image 5
- the black and white image, useful in getting to know my subject.
Subscribe to:
Posts (Atom)